Sunday, November 13, 2011

Birth of a dragon....

After a LONG gestation period, and a very slow hatching, Ryu was finally born on December 5, 2011 at 6pm.  As of right now, she is sitting on a countertop waiting for a place to fly.


Original post when I first started Ryu:   Celtic Wyvern Pattern by Smallworks blogpost.


Materials:  Cotton fabric, acrylic paints, buttons, fiberfill, wire.
Pattern:  Smallwork Kells Wyvern by Melinda Small

More babies to come in the future.  I really enjoyed making Ryu and will offer them in my shop as I work on more.  

BTW, Did you know this is the year of the Dragon?  Yup.. my oldest daughter is turning 24.  Wow.

Saturday, August 6, 2011

New Look 6977: Raglan sleeve top turned tank top

So I have New Look 6977, and got the raglan sleeve top to fit well.  After making some adjustments, it's become a TNT pattern in my stash and I've made a couple tops using this pattern.

So I really like this pattern and I saw a review of a very similar tank top version on patternreview.com:


New Look #6569 

It has the same look, with the gathered front at the bust and a V-neckline.  I wanted one... was going to purchase the pattern, but thought... well, hey... I have a similar pattern... let's see if we can make it into what I want.   Here's what I turned out with.


And I love it.  It's not as fitted as the pattern above, but then if it were, it might not look so presentable over the squishy parts of my body... Anyway, MINE fits me well, looks flattering and is pretty much the same as the pattern I was thinking of purchasing. So here's what I did to turn it into a tank top:

The picture below shows the original sleeve piece and the finished tank top piece.  I drew in the original lines for the front bodice so you can see where they overlap.  Here's what I did.
First, I retraced the front body piece with all the markings.
Then I laid it over the raglan sleeve piece, matching the upper portion of the raglan sleeve seam and matching approximately where the armhole notches were, and traced the shoulder and neckline section. Then I just guesstimated the curve of the armhole.In this picture, I traced the front bodice piece on the finished tank top pattern.  You can see where the original sleeve pattern piece overlaps the portion I added on for the tank strap.  The seam at the top portion of the raglan sleeve and the shoulder seams match.
Here's the finished pattern front piece:

I did the same thing with the back pieces. Again, the picture below shows the finished tank top piece and the sleeve piece together, with the back bodice piece drawn in along the shoulder blade.  The finished piece by itself is shown on the right.


That's pretty much it.  The pattern is ready.
I kept the neckline binding the same and just finished the armhole by folding it over and sewing.  Simple.  Quick.  And I have a TNT tank top pattern that cost me nothing more than a few minutes of my time.

Friday, May 27, 2011

Knock-off Anthropologie skirt

I saw this skirt on Anthropologie.com and love the cute styling.  I don't wear skirts and have no reason to make it.  But I have daughters who are just the right age for some cute stuff like this...

So here we go... First I'll need to adapt the style to something a bit more casual.  It will be used for school, not work, so I need to "casualize" it.  I lowered the waistline and made an elastic facing.  Then I shortened it to above the knee length and turned the button band into a zippered opening.

First, I'm tracing off a pattern my daughter used for a plain elastic waist skirt that she made several months ago.  She used a pattern from the "Sew U" book by Wendy Mullin (designer for Simplicity pattern's Built by Wendy line).  My daughter was very pleased with the fit, but for this skirt, I'll leave the dart shaping in the back, and eliminate the front darts.  They will be drafted into the button band feature and side seams.

Unlike the Anthro skirt, I'll cut this skirt 1 1/2" below the waistline since my daughter pulls her skirts down about this much so it rests on the high hip anyway, and shorten the hem to just above her knee.   I'm starting with a 12" skirt, but added an extra 3".   Here's the draft so far:


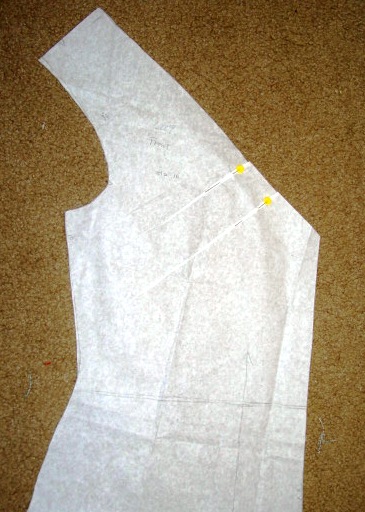
Now to add the more difficult details.  I won't be working with the back piece anymore, it's fine the way it is.  The front piece needs those fancy features though.... Here, I transferred one dart to the side seams, and turned the other one into an opening for the zipper.


I think I'll make the button band about 1" wide.  The skirt is small, and so proportionately this should work.  I traced off the top portion of the dart to the point where I want the button band to end and made it 1" wide.  I also drew the button band onto the skirt front to make the next few steps a little easier to visualize.

To make the gathers that fall from the bottom of the button band, I drew 3 parrallel lines going from hem to the bottom of the band, and cut the sections out.  Then, uh.... how do I explain this... well, this is what I did...

At this point, I realized that I could easily attach the side front piece to the end of the gathered part thereby eliminating a seam in the gathers, so I taped them together. I'm wondering if there's enough gathering here... but I don't want to have too much bulk at the end of the button band. 

Then I got stuck... So I made a paper model to try and figure out how I was going to put the pieces together.  Here's it is:

Sorry, it's sideways.  I couldn't figure out how to turn it the right way. 

Anyway, I traced off facing pieces using the patterns, folding out the darts and adding seam allowances where necessary.  I also cut a strip a little over twice as long and 1 1/4" wide for the little gathery bit on the side of the zipper opening. 

Hmmm....  I'm thinking about making that top button practical instead of decorative. I'll need something to sew it to, so I added a facing(?) under the bottom zipper piece. Now... off to sewing. 

It was difficult to sew the zipper/gathers/ skirt bits together, but using my paper model, I figured out the sequence of putting it together.  I can't tell you how I put it together, not because it's a secret, more like I don't remember.  I just kept going and couldn't stop or it would break my sewing "train of thought." 
Here's some pictures of the details:


And here's the finished skirt with a body in it.  It's perfect for her spunkiness.  And she loves it.  Thats why we sew!

Sunday, February 27, 2011

New Look 6889

SUPER SIMPLE!  If only I wore more dresses!    I made view D.  Originally, I made this pattern using silk twill.  According to measurement charts, I should cut a size 12.  But I cut the 10 after checking the finished measurements on the pattern tissue.  It was still baggy, so I took it in along the side seams by about 1" per side seam.  I could still pull it over my head, and it looks lots nicer.

Then I did it up in a tricot knit for a nightie.  I reduced the gathers along the neckline, pinching out about 1/2" total since I don't have much bust to fill it up.  Being that this fabric stretches, I also took in an additional 1" at the waist.   It gave it a little more shape and it's still comfortably loose.  Here's what the pattern looked like after I altered it.

Originally, I did follow the directions and used a self-fabric bias tape to make the neckline and armhole facings.  For the knit dress, I just did the fold over and sew thing.  Much faster, easier and still looks great.
I'm so sorry I don't have better pictures because this dress looks a lot better than the pictures I'm posting.  I'm considering doing a few tops in some knit fabric since the nightie came out so comfortable and it was very quick to put together.  I think it took about 2 hours from start to finish...


Sunday, February 6, 2011

RIPincushion

 
Pin Cushie (19something - January 27,2011) 
 
I murdered my pincushion.  No wait... it was a mercy killing.  He was bleeding sawdust pretty badly, and had lost his strawberry long ago.  There was nothing else I could do.  So I finally put him to rest. The sewing needles he kept as prisoners, locked away deep in his gut, were removed and will find a new home.  The Needlecase will be glad to take most of them in as many of them don't want to be separated from their family of sewing needles. But the remainder will probably be placed in a new pincushion.  Pins will remain in an orphanage box until a suitable pincushion has been found (or made).  I can't believe he had swallowed so many needles.  No wonder his last days were miserable.


His remains will be buried in Sewing Trash Memorial Waste Bin.  The family requests no flower pins please.

Thursday, February 3, 2011

Duvet Cover

I made these using STASH fabrics.  Can't believe I had the perfect stuff for the covers and never got around to doing it.  PR Stash contest saves the day!

This first comforter cover is for a Cal-King size bed and measures 88"x102".

And this one is for a twin size bed and measures 88" x 65"

Here's a quick tutorial on how to make a basic duvet cover (comforter cover).

First, take measurements of a cover you have.  Usually, you'll find that it's a few inches bigger than the comforter... sometimes up to 4" larger.  This allows for the "fluff" factor.  So if you don't have a cover but want to make one, take measurements and add a few inches.

My covers have pieced tops.  It's not hard to do,  just takes a little bit of math to add seam allowances where you piece.

It's easiest to place your button band along the bottom of the cover.  To do this, add an extra 2" to the bottom edge.  Then cut a facing piece about 2" wide by the length of the bottom edge.  I cut mine using the red fabric since I was nearly out of the taupe linen.    Make sure you interface the button band. Finish the facing edge.  Apply the facing to the bottom of the cover.  Turn, press and topstitch. Here is a view of the top and underside of the button band for the comforter cover top piece.


Make the buttonholes.  Here you can see what it looks like on the top and inside view.


The top of your cover is ready.  Now, I used a flat sheet to make the underside of the cover.  It's smooth, easy and it was already in my stash.  But... it doesn't quite match my comforter cover.  That's okay.  It doesn't bother me, and I'm saving the last of my fabric for the matchng pillow cover.   However, if you have a spare flat sheet that you'd like to use, but still have a some leftover fabric from the cover top, you could sew a border around your bottom piece using the face fabric. I didn't.  Sadly, I've now just about run out of that wonderful taupe linen. 

Anyway, to prepare the bottom section, measure the finished top piece and cut the same size piece, adding 2" for the button band.  At this point, if you want to add the border to the bottom piece, you could sew your extra fabric around the edges.  Cut 6" strips, fold 1/4" along one edge and topstitch it to the bottom piece, matching the cut edges.  You can simply overlap the corners, or get fancy and miter them.   Finish along the button edge, fold over 1 1/2" apply a strip of interfacing and stitch along the edges.  When that's done, place the top and bottom pieces right sides together and just sew around along three edges, leaving the bottom open.  Finish the edges, Give it a good pressing, sew the buttons on... and it's ready!

Kinda like sewing a giant bag... not so bad eh?

TIP:  If you have some card tables, place one behind your sewing machine, and one next to you.  It'll help support the huge amount of fabric you'll be working with.  Oh.. and it's best if the tables are either the same height or slightly lower than your sewing area.

Go to it!  It's such a rewarding project. And heck,  your bed won't mind if your stitching is slightly off or the fit is not perfect...Beds are forgiving like that...   :D

Wednesday, January 19, 2011

Duvet cover and Pillows

Thank God for the stash contest on PR.  I had all this wonderful fabric waiting to be made into something useful and FINALLY!  I got to work on it.

So here's a peek at my duvet cover made with a beautiful butterfly batik I found at Walmart quite a while ago... I can't remember when, but it must've been around the time I was into making shower curtains because there's only enough for a shower curtain.  I had this, plus another similar butterfly batik (I must've forgotten about buying the first one), several sashiko medallions I had made, and some leftover linen/cotton from my wedding.  The only thing I had to buy were 15 coconut buttons at 4/$1.00.  Wow.


Here are the pillows I made to match the duvet cover.


These have invisible zipper openings,  (see if you can find it in the first picture below), and the two different butterfly fabrics.  I also used the last of my navy linen to make the piping.  I had to use the second butterfly fabric when I ran out of the first.  But boy... I like it!  All of it was in my stash... including the zippers, so shopping my stash paid off!  :D  I'm happy!


I'm working on another set in barkcloth and linen for my daughter's bedroom and will include a better picture of my duvet cover and a simple tutorial next time.

Saturday, January 15, 2011

Flanged Pillow Coverings


My daughter picked up the Owl panel in Japan about 9 years ago and I've been wanting to make it into a pillow cover since then.  Just never found the time or the perfect fabric.  Who knew that it was sitting right here in my stash since I got married 7 years ago!  The navy blue linen was made into table coverings for my reception, and I've been saving it in my stash.  I used some of it for curtains when we bought our home but the remainder was stashed away for a duvet cover (tutorial coming soon).

Anyway, here's a quick tutorial for simple flange pillows.    First, you'll need your fabric panel.  The edges should be prefinished.  I've already sewn my panel onto the pillow top piece.  It's cut 2" larger than the panel.  A 2" flange looks just right for an 18" pillow, and I'll be sewing the flange along the inner edge of the red border.  That'll give me a 1/2" seam allowance.


To cut the back pieces, add about 6" to half the measurement for overlap.  There will be a simple overlap in the back to insert the pillow.   You'll need 2 pieces.  Here are the pieces... not much to it eh?  :)


You will need to cut interfacing for the flange (in my case, 2 1/2" wide and whatever length it will be to cover the flange area).  You will also need to cut interfacing for your overlap.  It will help make keep the edge from stretching out and keep it crisp.  I cut mine about 2" x the width of the pillow.  Interfacings will be applied to the pillow back pieces.  Clip off the corners so the finished corners will be look crisp.  And finish the edge for the overlap.  Then adjust the pieces by laying the pillow backs onto the front piece, match the edges and fold over.  I simply folded about 2" and have about 2" overlapping.  The opening is not in the center, but I don't mind.  I prefer to have it below the center. 


After the prepping all the pieces, pin them right sides together and sew a 1/2" seam allowance all the way around the edges.  Press flat.


To make the flange,  I changed my top thread to red and used navy in the bobbin.  Then I sewed along the inner edge of the red border on the pillowtop, creating a 2" flange.  After that, I closed the overlap on the flange by hand sewing it shut.   This is the underside of the pillow. 


Helpful tip for turning corners neatly:
1)  Fold along the stitching lines first to form a nice folded corner.
2)  Lay something somewhat pointy, like a chopstick, at the corner, using it to support the corner before you turn it.
3)  Turn the corner, keeping the edges folded, and use the chopstick to push the point out.  Make sure the inner folds don't shift or it'll be like stuffing an elephant into a refrigerator. 
4)  Press.  Nice corners :)

Wednesday, January 5, 2011

New Look 6813

I like this pattern. With a few adjustments it ended up looking as good as the picture. The muslin was made in size 12/14/14, according to my measurements and it didn't really look like it fit well. So I downsized to a 10/12/12. Now it looks like the picture on the pattern.

I did have to make a few adjustments to the pattern in order to eliminate the gaping neckline. I pinched out little bits along the inner neckline, and flattened it to the edges. Kinda like making tiny darts. Since it's made in stretch fabric, it was easy enough to ease in the front and back pieces to the neck band. Here you can see the little pinches I made in the pattern:
And I added about an inch to the sleeve length. That's a simple adjustment...


The technique used for applying the neckline would've created a lot of bulk, so instead of turning the inside edges under and sewing through all those thicknesses, I left it flat and trimmed it down to 1/4" after top stitching the neckline. You could also just apply the neckline with your serger and eliminate a bunch of extra steps, but my serger is set up with light colored thread and I was too lazy to dig up darks.

Here's a detail of the topstitching. I like the blue on brown color combo...


And here's the finished top in brown.  Sorry about picture quality...


 And the second one made in Red, using some poly jersey.  I like the way it looks, but it's not going to work for hot weather...

 
Oh well... another TNT pattern to add to my collection.