Wednesday, September 8, 2010

Mitered Corner napkins

As promised, here are the mitered corner napkins I made using some leftover cotton fabric. These are my favorites and for our family, I think the smaller size works best.  We use them to wrap breakfast to eat on the road, and they are small enough for children to manage at regular mealtimes.  The bigger ones seem to end up knocking over milk cups... which kinda defeats the purpose of using napkins... mess prevention.

On the larger, dinner sized napkin, the central square measured 18" and the border is 2" wide.  It took about 1/3 yard 45" fabric in order to make this border, 2 strips, each cut 5" wide.
The smaller napkins are cut 10 1/2" with a 1 3/4" border.  I chose this size because I could get 4 napkins out of  1/3 yard of 44" fabric.  And I'm not sure how much yardage I used for the borders, but it took about 1 1/4 strips to make one small napkin.

Here's how I cut my small napkins:

Cut your central square whatever size you'd like.  In this case 10 1/2".  1" of this will be your seam allowances. (1/2" each side)

Cut your strips adding 4 times the length + twice the finished border width for each corner.  The width of the strip should be twice the depth of the border + 1".  For mine, it's 4 1/2"... 1 3/4" + 1 3/4" + 1" = 4 1/2"


Sew the strips together and press open your seam., then press the edges up 1/2" on both sides, and fold in half, matching edges and press flat.

Now, make the corners.  It's a bit hard to explain this, but you open your border and use the fold lines to construct your miters.  To make those miters, fold your border piece right sides together, matching the folds.
Then measure the width of your finished border  (1 3/4" here) along the top and bottom fold lines.  Mark.  Connect these marks to the center fold, forming a "V"... this forms the mitered corner when you're finished. Sew from one mark, up to the tip of the V, then down to the bottom mark. 

The measurement from corner to corner at the beginning of each V is 9 1/2"(see picture above).

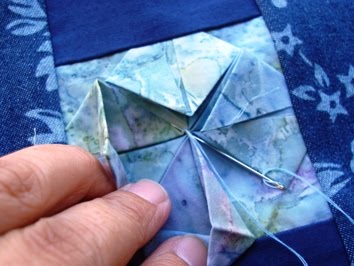
Here's a close up.  The measurement from the vertical folded edge on the left side to the little mark where the start of the V is measures 1 3/4".  This is where you start sewing.  Don't sew into the seam allowances.

Trim the corners and close off the border.  From V to V on my napkin, it measure 9 1/2".

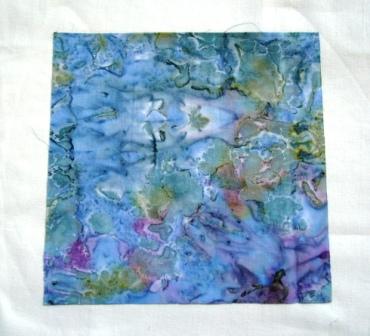
 Turn and press, making sure the folded edges match.  Now you've got a nice frame to work with.

Pin the center piece in, sandwiching it between the border edges.


 Sew it in.

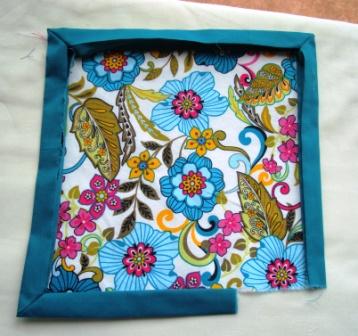
The nicest detail here is the stitching used to sew the border on.  I used one of the decorative stitches on my machine and it came out looking very nice.  It also assured that the border on the opposite side would be caught in the sewing, even if I was slightly off.

And that's all folks!   Oh...  if you want the napkins to look good on both sides, simply double your center fabric and place them wrong sides together.  Nice!   These would make a great hostess gift for the holidays...  Gonna have to dig through my stash and see if I have some nice holiday prints! 

Thursday, August 19, 2010

Coasters

So ya know, I ran out of fabric to finish those mitered napkins and got sidetracked...


I made some very simple coasters instead.  My DH is constantly putting his soda glass right next to my little laptop and of course a puddle ensues.  And I started to worry that someday, the laptop would be sitting in water and ZAP!  no more laptop.

So I made coasters and keep a couple right next to the laptop so he has NO EXCUSE for letting the water pool anymore.

They're simply cut into 4x4" squares, and sandwiched with a layer of thin cotton batt in between.  I used two different types of fabric, didn't have enough of the green one but lots of other scraps....

Then I serge all the way around, trim threads and dab the corners with some Fray Check.

  Took less than 20 minutes to make 4 of these.  And I made more napkins, dinner size, for a matching set!  Woohoo! 

 And yes, I'm trying to avoid going to the fabric store...  You know how that goes...  :D

Friday, August 13, 2010

Cloth napkins.. oops

Y'know how you really want to make something and think you just might be able to squeeze it and make it work out?  But it doesn't?  yeah... this is one of those times.  I knew the border was too short... but I wanted to make it work.  Of course it didn't, so I guess I WILL have to go out and buy a little more fabric  (YES!)  I have enough of this fabric to make a pair of dinner napkins too!  That'll be the next tutorial... Fancy mitered edge napkins.

Thursday, August 12, 2010

Cloth Napkins - Simple ones

Okay... I'm a fabric hoarder.  I have so many scraps that are just large enough to make something useful from, but not large enough for garments or the big home dec stuff I want.  But some of these pieces are just big enough for a set of small cloth napkins.  Yeah... I'd like bigger dinner sized ones but these'll work and my Chinese blood feels good about not wasting fabric.  And it only took about 30 minutes for a set of 4.

So here's a quickie tutorial on how I got these done...
First tip... I used barkcloth scraps.  You can easily see the crosswise AND lengthwise grain making cutting really quick.  These were leftovers from a set of curtains I made for a client.  She lets me keep the scraps when the customer doesn't want them back, which is why I accumulate so much fabric... hmmmm... Anyway, here's a link to her webshop, the stuff is perfect for home dec things if you like that tropical look.  Barkcloth Hawaii.

So cut your napkins 1" bigger than your finished size.  Mine turned out to be just under 12".  A bit small, but it's what I have to work with.  Then fold over and press two opposite sides 1/4", and again, 1/4".  It should look like this.

Next, fold and press 1/4" and 1/4" again on the two other sides.  It'll look like this when it's ready for sewing.

Yup... that was the hard part.  Now all you need to do is sew.  I used the edgestitch foot and just sew all the way across on all four sides.

Simple enough eh?  So now you can go green and stop buying all those paper napkins... unless someone likes to blow their nose in it... eww.. yeah... he can use the paper towels instead.

Wednesday, August 11, 2010

Faith Hope Love by McKenna Ryan


I finished them all!  Here they are and they're ready for hanging.   As promised, here's a view of the back, after I finally got the invisible thread working properly... 

And this block is my favorite... mostly because of the quilted butterfly sitting on the "e".  

This project was incredibly challenging.  I think the hardest thing was keeping that thread under control, but the results were well worth the trouble.  I have McKenna Ryan's Forest Hollow pattern as well and will soon work on that one.  I'm planning on using it to create blinds for my daughter's bedroom.  She loves owls.

And on to the next project....Hmmmm... that dragon is still waiting for his wings, but I think I wanna clean up the mess here and de-stash a bit.  Maybe make something with my scraps next... I'm thinking cloth napkins...

Binder Cover Tutorial - Part 4: More Construction

Okay.. today we'll finish it up!  


First, let's tack down that origami flower.  Add a button or bead in the center if you'd like, but tack the middle. You can also tack the petals open if you'd like, but I usually save that for last.   


Let's get the back/sleeves ready.  To prepare the sleeves,  machine hem the straight edge by folding over 1/4" and pressing.  Then fold over 1" and press again.  Sew along that edge and your sleeves are ready to attach to the back piece.  Here's what they should look like.


Now, sew the sleeves onto the back piece. Place the wrong side of the sleeve onto the right side of the back fabric piece.  Sew all the way around using a 1/2" seam allowance.  Don't worry, it'll turn out correctly....


Now, place the front piece (the one with the interfacing) and the back piece (the one with the sleeves) right sides together and pin, matching the raw edges.  Make sure you are tracing just slightly outside the edges of the binder.  This will allow the necessary ease to slip the binder into the cover.  Don't sew yet.... one more step.


Slide the binder to the side just a little bit, a scant 1/4" will do. Trace.  This is the amount of ease you'll need in order to close the binder.  When you slide it back, it should look like this.  Now you're ready to sew.


Sew along your traced line, leaving an opening for turning the cover right side out.  Trim to 1/4" all the way around, clip your corners and give it a good pressing.


I like to press up the opening before turning.  This makes it easier to hand-stitch the opening shut when we're done.  Just fold it up along the traced line and press.


We're almost done.  Turn and press....


Slip stitch the opening shut....


Tack down the petals.... and it's done!  Ready for a new school year!


Tuesday, August 10, 2010

Binder Cover Tutorial - Part 3: Construction


We're ready to put the pieces together!  First, lets separate the outer pieces from the backing pieces.

I like to place them "mapped."  In other words, they're placed in position.  Here's the front pieces:


And here are the backing pieces:

Lets start putting together the front pieces.  Remember, all seam allowances on the decorative strip are 1/4".  We'll start by constructing the pencil pocket.  Hem the top edge by folding over 1/4" and press, then fold over 3/4" more and press, then sew.
Next, fold it down the center, lengthwise, and draw a stitching line.  Then make gathering stitches on the bottom edge of the pocket.  To make the gathering stitches, set your stitch length to 5.0 and sew just inside the 5/8" seam allowance.  Sew another row of stitches about 1/4" along that row.

Place the pocket piece on the bottom strip (back of the pocket), matching the bottom edge and sew using a regular straight stitch.  Then sew the sides of the pocket piece, matching the edges.  Gather the bottom to fit and sew across the gathered edge.  Your pocket piece is ready to sew into the decorative strip.

Assemble the origami flower/pocket strip pieces using 1/4" seam allowances.


Next, sew the front and back panel pieces to the strip using 1/4" seam allowances.  Press.  Here's the completed front piece.  


Apply the interfacing to the back of the front piece.


We're ready for Part 4:  More Construction

Wednesday, July 7, 2010

Binder Cover Tutorial Part 2: Cutting and preparing pieces.


Quite simply, you place the pieces on the fabric conservatively observing grain lines, and trace around each piece.  Most require only one piece.  The only one that needs 2 pieces will be the binder cover sleeve.  Make sure you follow the grain lines.    Here's what you should have for the front pieces. In this picture, the origami flower is already folded.  To prepare the Pencil Pocket piece, draw a stitching line down the center length of the pencil pocket back and the pencil pocket front pieces.


And here are the back pieces, interfacing included.


Of course, we'll need to fold that origami flower, so here's how it's done:

Start with a square
.
Fold it in half, open it up and fold it in half the other way...


This is what you'll end up with (guidelines for the next step)


Now fold each corner into the center:


Turn it over, and fold it in half so you have some nice guidelines for the next step.


Now that we have some guidelines, open it up (corners should still be folded into the middle) and use the folds to do the next step.  Match the edge to the guideline folds you just made.  Do this on all four sides..  These are also more guidelines for the next step:


I usually give it a quick press with the iron while doing each step so I have clear guidelines to work with.


After you finish those guidelines, you should end up with this:


This is the tricky part....  A picture paints a thousand words...  See if you can figure out what I did.


Do this for all four corners and here's what you'll end up with... We're almost done.

   Give it a good press.  Turn it over and unfold the corners, give it another good press.


Here's what the other side looks like:

And now it's ready to be sewn into our design.  That's Part 3.  Soon to come.... Construction