
Here's what we're working on today. Our binder cover has an origami fabric flower and two pencil (or tracing wheel) pockets. It's a perfect way to start off a new school year! Let's start by making a pattern.
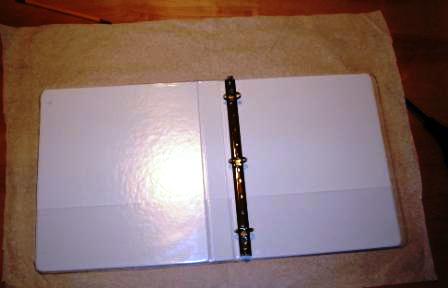
1) Making the master pattern is very simple. First, trace around your open binder, adding about 1/4" extra along one short side so your binder will close. Try it...you'll find that you need that extra 1/4" for *ease. My binder measures 11 1/2" x 22" when it's open. The spine is about 1 1/2" wide. After tracing and adding ease, my pattern piece ended up being 22 1/2" x 11 3/4." This is BEFORE adding seam allowances.
2) Next, draw in the elements you want to include in your design. I wanted to have an origami flower and a two pencil pocket. Here's a close up of the elements. It's a little hard to see, but if you compare it with the finished cover, you can see the separate elements.

3) Use the master pattern to trace off the pattern pieces, adding seam allowances. I used a tracing wheel and tracing paper to transfer it to oaktag. Then I added 5/8" seam allowances around the perimeter, and 1/4 seam allowances on the inside seams (the section with the decorative strip). Don't forget that the top strip piece, bottom strip and pocket pieces all fall on the perimeter too and will need 5/8" seam allowances on one edge. The origami flower requires a square that is twice as big as the pattern piece. Here's a better view of my decorative pieces:

I used oaktag to make my pattern pieces as I intend to use this pattern often. In this picture, the pieces are as follows, cut 1 each unless otherwise stated.

Top row: Binder Cover Sleeve (Cut 2)- add 1" along the straight side for hems, Origami Flower (7"square), Pencil Pocket - add 1" along the top edge for hem., 1/4" seam allowance on sides and top edges, 5/8" seam allowance on bottom edge, and make sure it's 1/2" wider than the strip pieces. Prepare the Pencil Pocket by folding in half lengthwise and drawing a line in the crease. This will be the sewing line when you apply it to the Bottom Strip piece.
Middle row: Binder Cover Back (5/8" seam allowance around perimeter, 1/4" seam allowance on straight edge), Top Strip (5/8" seam allowance along the top edge, 1/4" seam allowance on all other edges), Bottom Strip (5/8" seam allowance on bottom edge, 1/4" seam allowance on all other edges), and Front Cover Piece (5/8" seam allowance around perimeter edges, 1/4" seam allowance on straight side).
Bottom row: Backing piece. Cut 1 fabric, cut 1 interfacing both with 5/8" seam allowance.
*ease = The extra room calculated into the pattern provided for movement... in this case, to close the binder.
Draw in grainlines and get ready to cut!
Next: Cutting and preparing the pieces. Folding the origami flower.
3 comments:
Glad I found this!
awesome ...exactly what I have been looking for ... for 4 days...LOL thank you sew much!
So, I’m trying this right now. I’m on step one. It appears you added a half inch to the width. Yes?
Post a Comment