Showing posts with label Fabric Origami. Show all posts

Wednesday, August 11, 2010

Binder Cover Tutorial - Part 4: More Construction

Okay.. today we'll finish it up!  


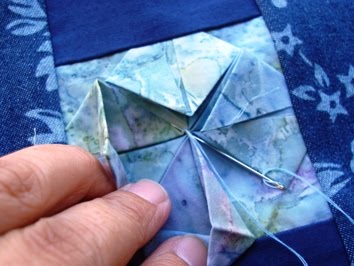
First, let's tack down that origami flower.  Add a button or bead in the center if you'd like, but tack the middle. You can also tack the petals open if you'd like, but I usually save that for last.   

Let's get the back/sleeves ready.  To prepare the sleeves,  machine hem the straight edge by folding over 1/4" and pressing.  Then fold over 1" and press again.  Sew along that edge and your sleeves are ready to attach to the back piece.  Here's what they should look like.


Now, sew the sleeves onto the back piece. Place the wrong side of the sleeve onto the right side of the back fabric piece.  Sew all the way around using a 1/2" seam allowance.  Don't worry, it'll turn out correctly....


Now, place the front piece (the one with the interfacing) and the back piece (the one with the sleeves) right sides together and pin, matching the raw edges.  Make sure you are tracing just slightly outside the edges of the binder.  This will allow the necessary ease to slip the binder into the cover.  Don't sew yet.... one more step.


Slide the binder to the side just a little bit, a scant 1/4" will do. Trace.  This is the amount of ease you'll need in order to close the binder.  When you slide it back, it should look like this.  Now you're ready to sew.


Sew along your traced line, leaving an opening for turning the cover right side out.  Trim to 1/4" all the way around, clip your corners and give it a good pressing.


I like to press up the opening before turning.  This makes it easier to hand-stitch the opening shut when we're done.  Just fold it up along the traced line and press.


We're almost done.  Turn and press....


Slip stitch the opening shut....


Tack down the petals.... and it's done!  Ready for a new school year!


Wednesday, July 7, 2010

Binder Cover Tutorial Part 2: Cutting and preparing pieces.


Quite simply, you place the pieces on the fabric conservatively observing grain lines, and trace around each piece.  Most require only one piece.  The only one that needs 2 pieces will be the binder cover sleeve.  Make sure you follow the grain lines.    Here's what you should have for the front pieces. In this picture, the origami flower is already folded.  To prepare the Pencil Pocket piece, draw a stitching line down the center length of the pencil pocket back and the pencil pocket front pieces.


And here are the back pieces, interfacing included.


Of course, we'll need to fold that origami flower, so here's how it's done:

Start with a square
.
Fold it in half, open it up and fold it in half the other way...


This is what you'll end up with (guidelines for the next step)


Now fold each corner into the center:


Turn it over, and fold it in half so you have some nice guidelines for the next step.


Now that we have some guidelines, open it up (corners should still be folded into the middle) and use the folds to do the next step.  Match the edge to the guideline folds you just made.  Do this on all four sides..  These are also more guidelines for the next step:


I usually give it a quick press with the iron while doing each step so I have clear guidelines to work with.


After you finish those guidelines, you should end up with this:


This is the tricky part....  A picture paints a thousand words...  See if you can figure out what I did.


Do this for all four corners and here's what you'll end up with... We're almost done.

   Give it a good press.  Turn it over and unfold the corners, give it another good press.


Here's what the other side looks like:

And now it's ready to be sewn into our design.  That's Part 3.  Soon to come.... Construction