Showing posts with label Patterns. Show all posts

Saturday, August 6, 2011

New Look 6977: Raglan sleeve top turned tank top

So I have New Look 6977, and got the raglan sleeve top to fit well.  After making some adjustments, it's become a TNT pattern in my stash and I've made a couple tops using this pattern.

So I really like this pattern and I saw a review of a very similar tank top version on patternreview.com:


New Look #6569 

It has the same look, with the gathered front at the bust and a V-neckline.  I wanted one... was going to purchase the pattern, but thought... well, hey... I have a similar pattern... let's see if we can make it into what I want.   Here's what I turned out with.


And I love it.  It's not as fitted as the pattern above, but then if it were, it might not look so presentable over the squishy parts of my body... Anyway, MINE fits me well, looks flattering and is pretty much the same as the pattern I was thinking of purchasing. So here's what I did to turn it into a tank top:

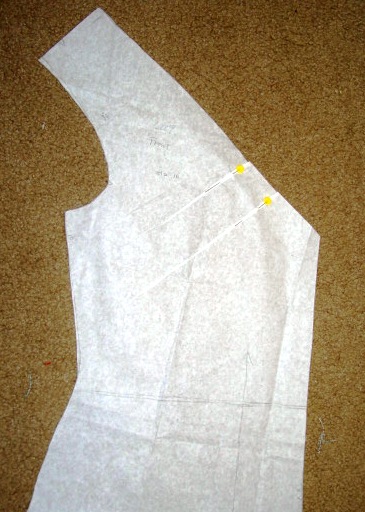
The picture below shows the original sleeve piece and the finished tank top piece.  I drew in the original lines for the front bodice so you can see where they overlap.  Here's what I did.
First, I retraced the front body piece with all the markings.
Then I laid it over the raglan sleeve piece, matching the upper portion of the raglan sleeve seam and matching approximately where the armhole notches were, and traced the shoulder and neckline section. Then I just guesstimated the curve of the armhole.In this picture, I traced the front bodice piece on the finished tank top pattern.  You can see where the original sleeve pattern piece overlaps the portion I added on for the tank strap.  The seam at the top portion of the raglan sleeve and the shoulder seams match.
Here's the finished pattern front piece:

I did the same thing with the back pieces. Again, the picture below shows the finished tank top piece and the sleeve piece together, with the back bodice piece drawn in along the shoulder blade.  The finished piece by itself is shown on the right.


That's pretty much it.  The pattern is ready.
I kept the neckline binding the same and just finished the armhole by folding it over and sewing.  Simple.  Quick.  And I have a TNT tank top pattern that cost me nothing more than a few minutes of my time.

Sunday, February 27, 2011

New Look 6889

SUPER SIMPLE!  If only I wore more dresses!    I made view D.  Originally, I made this pattern using silk twill.  According to measurement charts, I should cut a size 12.  But I cut the 10 after checking the finished measurements on the pattern tissue.  It was still baggy, so I took it in along the side seams by about 1" per side seam.  I could still pull it over my head, and it looks lots nicer.

Then I did it up in a tricot knit for a nightie.  I reduced the gathers along the neckline, pinching out about 1/2" total since I don't have much bust to fill it up.  Being that this fabric stretches, I also took in an additional 1" at the waist.   It gave it a little more shape and it's still comfortably loose.  Here's what the pattern looked like after I altered it.

Originally, I did follow the directions and used a self-fabric bias tape to make the neckline and armhole facings.  For the knit dress, I just did the fold over and sew thing.  Much faster, easier and still looks great.
I'm so sorry I don't have better pictures because this dress looks a lot better than the pictures I'm posting.  I'm considering doing a few tops in some knit fabric since the nightie came out so comfortable and it was very quick to put together.  I think it took about 2 hours from start to finish...


Wednesday, January 5, 2011

New Look 6813

I like this pattern. With a few adjustments it ended up looking as good as the picture. The muslin was made in size 12/14/14, according to my measurements and it didn't really look like it fit well. So I downsized to a 10/12/12. Now it looks like the picture on the pattern.

I did have to make a few adjustments to the pattern in order to eliminate the gaping neckline. I pinched out little bits along the inner neckline, and flattened it to the edges. Kinda like making tiny darts. Since it's made in stretch fabric, it was easy enough to ease in the front and back pieces to the neck band. Here you can see the little pinches I made in the pattern:
And I added about an inch to the sleeve length. That's a simple adjustment...


The technique used for applying the neckline would've created a lot of bulk, so instead of turning the inside edges under and sewing through all those thicknesses, I left it flat and trimmed it down to 1/4" after top stitching the neckline. You could also just apply the neckline with your serger and eliminate a bunch of extra steps, but my serger is set up with light colored thread and I was too lazy to dig up darks.

Here's a detail of the topstitching. I like the blue on brown color combo...


And here's the finished top in brown.  Sorry about picture quality...


 And the second one made in Red, using some poly jersey.  I like the way it looks, but it's not going to work for hot weather...

 
Oh well... another TNT pattern to add to my collection.  
. 

Wednesday, July 7, 2010

Binder Cover Tutorial Part 2: Cutting and preparing pieces.


Quite simply, you place the pieces on the fabric conservatively observing grain lines, and trace around each piece.  Most require only one piece.  The only one that needs 2 pieces will be the binder cover sleeve.  Make sure you follow the grain lines.    Here's what you should have for the front pieces. In this picture, the origami flower is already folded.  To prepare the Pencil Pocket piece, draw a stitching line down the center length of the pencil pocket back and the pencil pocket front pieces.


And here are the back pieces, interfacing included.


Of course, we'll need to fold that origami flower, so here's how it's done:

Start with a square
.
Fold it in half, open it up and fold it in half the other way...


This is what you'll end up with (guidelines for the next step)


Now fold each corner into the center:


Turn it over, and fold it in half so you have some nice guidelines for the next step.


Now that we have some guidelines, open it up (corners should still be folded into the middle) and use the folds to do the next step.  Match the edge to the guideline folds you just made.  Do this on all four sides..  These are also more guidelines for the next step:


I usually give it a quick press with the iron while doing each step so I have clear guidelines to work with.


After you finish those guidelines, you should end up with this:


This is the tricky part....  A picture paints a thousand words...  See if you can figure out what I did.


Do this for all four corners and here's what you'll end up with... We're almost done.

   Give it a good press.  Turn it over and unfold the corners, give it another good press.


Here's what the other side looks like:

And now it's ready to be sewn into our design.  That's Part 3.  Soon to come.... Construction


Sunday, May 9, 2010

McKenna Ryan's Faith Hope Love art quilts

The other project I'm working on is the art quilt series "Faith Hope Love" by McKenna Ryan.  I found it at Nancysnotions.com for just under $200.00.  And it was a kit of patterns and fabrics.  I'll have to pick up batting and backing but I was surprised that everything was there.  They did substitute a couple of fabrics, but it is SUCH a great deal that I couldn't pass this one up.   The colors of the fabrics are slightly brighter, not as neutral looking.  But I think that will be nicer for my home.  My home is rather bland, which is why I thought something like this would look nice.  The slightly brighter colors will bring a more cheery look to my otherwise neutral home.

I've already finished making the blocks, just have to get the backing and quilting done and then mount them... so here's what it looks like right now...

I hope the fit nicely onto the frames.  This week, I plan to get some of the quilting done, and maybe have them all mounted before the kids are out of school.  While they're in summer school, I'll be teaching my niece and her friend how to sew, so that will keep me busy. 

Will post an update on this batch when it's done and mounted on my wall! 

Smallworks Celtic Dragon

 One of the projects I'm currently working on is a Smallworks Kells Wyvern.  The picture above is directly from the website of Melinda Small (link below) and is the pattern I'm using to make my own little mascot.  A while back, I made the Dragon pattern (#4063) offered by Simplicity and was dissatisfied with the results.  I reviewed it a few years ago on Patternreview.com.  Since then, I've been hoping to find a  pattern that looks a little more ... artsy... realistic... kinda... and  I found a line of wonderful patterns by artisan Melinda Small.  Her fantasy patterns are wonderfully detailed and instructions are very good.  I'm not a doll maker, maybe this is why my Simplicity Dragon was such a fail, so having every detail, from tools to stitch size is extremely helpful.

I've selected fabrics, traced patterns and cut them out.  Currently I'm putting it all together, which is taking a bit of time.  But here are a couple pics of my current status.

The pattern requires several fabric choices, and here are the selections I made:
The picture below is the current state of my dragon/mess.  The pieces are small and curves are tight, but her directions are very good.  I am finding this project to be difficult, but doable, and as long as I take my time, I think the little bugger will end up being a wonderful little mascot to guard my front door.  
More progress to be posted soon...  I'm hoping he'll be ready for his first flight within a month.

Friday, April 9, 2010

Simplicity Fish pattern turned Shark


A while back I used the Simplicity 4926: Fish costume pattern to make a shark.  Here's the shark:


 The review is posted on PatternReview.com.  A PR friend wants to make one for her son so I offered to post the pics of the shark pattern pieces.  So this one's for you. I hope it's helpful.  If you have any trouble with it, feel free to contact me.

Here's a picture of the white underside piece.  I laid the fish piece on top so you can see what I did to adapt it.

And this one is the body/tail piece.  The little U shape in the bottom/front is actually supposed to be cut out.  That will be where the pectoral fins would be sewn in.


Here's his head.  This one was a little bit tricky to get just right so the mouth is kinda under the head, but you can still see out of it. 


These are the pectoral fins.   They should fit neatly into the shoulder holes on the pattern.  Measure the seam along the right side to make sure it'll fit.


Teeth were cut from two layers of a thick interfacing (if I remember correctly).  For those, I just measured the length of the mouth openings and cut a strip of teeth with a 5/8" seam allowance along the bottom.

Foam is extremely hard to work with, but if you have strong hands, I would recommend it.  The thicknesses make it nearly impossible to fit under the presser foot, and I'm not sure if you'll be able to maneuver those curves for the shark underside.  I used a couple layers of thick interfacing since it was such a struggle to work on the fish using the foam.    And he will probably need a support rod along the back, and maybe around his sides too.  I used a couple of foam supports that my son had for another toy to keep it from wilting.

Please send me a pic of your shark when you finish and share your adventure with me.  Good luck and happy sewing!

Last Halloween, my son decided he wanted to be a Star Wars character, but dad and uncle wore the shark and fish costumes to take him trick or treating.  I think they had more fun than he did.


Tuesday, January 12, 2010

Them's sum sexy fishin' lures...


I made this one for my college age daughter.  I'll try to get a picture with a body in it when she comes home. It's a pattern from an old Burda magazine, July 98 issue.  I can't believe I still have it. The pattern in the magazine has only the metal rings, but I couldn't find nice, sturdy looking rings and decided to check out some fishing tackle instead.  These metal rings and parts are swivels and stuff that I got for a couple dollars in Walmart's fishing supply department. 

Here's a view of the back.


And on the inside, I added a built in bra.  It's not really for support, more to provide some coverage so nothing shows through.   


It was an interesting pattern, and I had fun making it.  The sleeves will require reshaping as the shoulder seam seems to be a bit pointy.  I think it's suppose to sit on the curve of the shoulder, but it doesn't look right.  I ended up flattening out the shoulder seam.  Also, I would add a couple more inches to the hem next time...if there is a next time... and there might be because now my younger daughter thinks this is a cool shirt.

There are a couple more unusual looking tops in this issue so I think I'll try making more of them....  Funny... when I first bought this issue, I thought these would be a little to daring.  Strange what age will do to us... I think I might try wearing one of those someday.